
遗留 Servlet 应用渐进接入 Spring Boot:构建、自动配置与 WAR 双模式#
摘要:大规模迁移 Spring Boot 前,应先有可重复的集成验证与可控的依赖基线;随后按「Starter → 自动配置排障 → 外置容器内的 Spring 上下文 → 过渡期 Holder → Bean 化 → Servlet 注解化 → 可执行 WAR」分层推进。下文按依赖与运行时层次组织,并对照官方参考手册区分「演示型」引导路径与手册主推路径;个别行为(例如仅启动非 Web 上下文时的进程生命周期)若官方未逐句界定,则保留工程层面的不确定性说明。
1. 集成测试护栏:构建生命周期与嵌入式 Servlet 容器#
(1) 原理与动机:渐进重构时,单元测试难以覆盖类加载、部署描述符与真实 HTTP 路径;将 WAR 交给 Maven 插件驱动的嵌入式 Servlet 容器启停,并把探测请求绑定到 verify 等阶段,可在 CI 中与 mvn clean verify 同类流程组合,形成「改一点、验一轮」的闭环。
(2) 实现抓手:Codehaus Cargo 的 Maven 3 Plugin 文档给出可与 Maven 生命周期组合的用法及 containerId 示例;Tomcat 10.x 对应标识见 Tomcat 10.x 容器说明(tomcat10x)。Maven 各阶段职责见 Maven 生命周期介绍。
(3) 怎么用:客户端仅做存活与路由探测(以下为约定路径示例;实际 context-path 须与部署一致)。
curl -sS -o /dev/null -w "%{http_code}\n" "http://localhost:8080/petclinic/api/owners"
服务端侧即插件启停的容器内已部署 WAR:上述请求由运行在容器中的同一个应用接收(例如映射到既有 Servlet),无需额外桩服务。
2. 目标形态与版本阶梯:Initializr、Java、Jakarta 与 BOM#
(1) 原理与动机:用 Spring Initializr 生成「目标依赖集合」,可避免手工拼 starter 造成的漂移;同时 Java / Jakarta EE 代际决定了可选的 Spring Boot 主版本——Boot 3 GA 起官方叙事明确落在 Jakarta EE 10(EE 9 baseline)与 Java 17 基线之上。
(2) 实现抓手:Spring Initializr(start.spring.io) 生成 POM 或 Gradle;系统要求见 Spring Boot 系统要求;代际背景可参考 Spring Boot 3.0 Goes GA — Java 17 与 Jakarta EE。依赖版本聚合可使用 BOM:构建系统 — spring-boot-dependencies。多 BOM import 时的精确优先规则若在复杂场景中存在歧义,应以 dependency:tree 实测为准(Maven import 语义见 Importing Dependencies)。
(3) 怎么用:在自有 dependencyManagement 中导入 Boot BOM 后,对 WEB-INF/lib(或等价产物)在导入前后做目录级 diff,可快速发现 Jackson 等同族模块版本撕裂。
<dependencyManagement>
  <dependencies>
    <dependency>
      <groupId>org.springframework.boot</groupId>
      <artifactId>spring-boot-dependencies</artifactId>
      <version>${spring-boot.version}</version>
      <type>pom</type>
      <scope>import</scope>
    </dependency>
  </dependencies>
</dependencyManagement>
3. 首个 Boot 依赖:spring-boot-starter 与日志栈#
(1) 原理与动机:spring-boot-starter 引入核心引导能力并默认落到 Logback(见 日志特性 — 默认 Logback);与遗留日志实现并存时易出现绑定冲突,需要在 POM 层显式排除或切换。
(2) 实现抓手:切换到 Log4j 2 的典型做法是排除 spring-boot-starter-logging 并引入 spring-boot-starter-log4j2(How-to — Configure Log4j);starter 清单仍见 Starters 表。
(3) 怎么用:
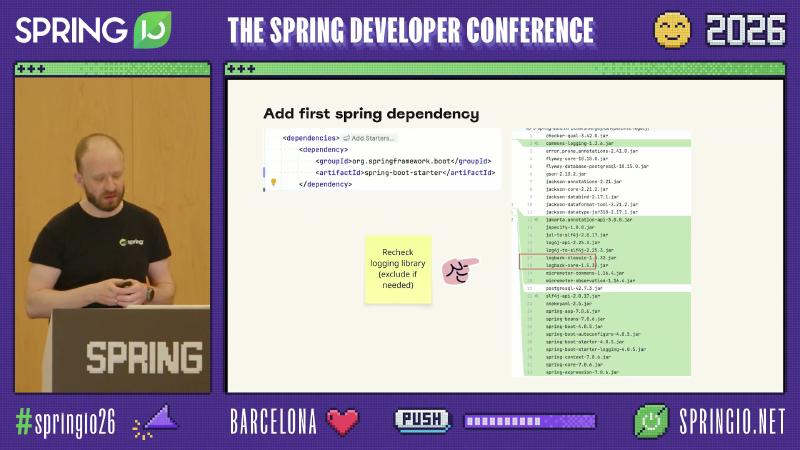
<artifactId>spring-boot-starter</artifactId> 与「Recheck logging library」提示。
<dependency>
  <groupId>org.springframework.boot</groupId>
  <artifactId>spring-boot-starter</artifactId>
</dependency>
<dependency>
  <groupId>org.springframework.boot</groupId>
  <artifactId>spring-boot-starter</artifactId>
  <exclusions>
    <exclusion>
      <groupId>org.springframework.boot</groupId>
      <artifactId>spring-boot-starter-logging</artifactId>
    </exclusion>
  </exclusions>
</dependency>
<dependency>
  <groupId>org.springframework.boot</groupId>
  <artifactId>spring-boot-starter-log4j2</artifactId>
</dependency>
4. 应用入口:@SpringBootApplication、扫描边界与 Web 环境判定#
(1) 原理与动机:主类应置于根包之上以便组件扫描(组织代码)。若 classpath 上既无 Spring MVC 又无 WebFlux,SpringApplication 会走非 Servlet 的 AnnotationConfigApplicationContext(Web Environment 判定)。此时进程是否立即退出、退出码是否为 0,还受非守护线程等因素影响;文档未明确将「必为 0」与该行绑定,线上应以观测为准。
(2) 实现抓手:@SpringBootApplication 聚合 @Configuration、@EnableAutoConfiguration 与 @ComponentScan;入口为 SpringApplication.run。
(3) 怎么用:
@SpringBootApplication
public class PetclinicApplication {
    public static void main(String[] args) {
        SpringApplication.run(PetclinicApplication.class, args);
    }
}
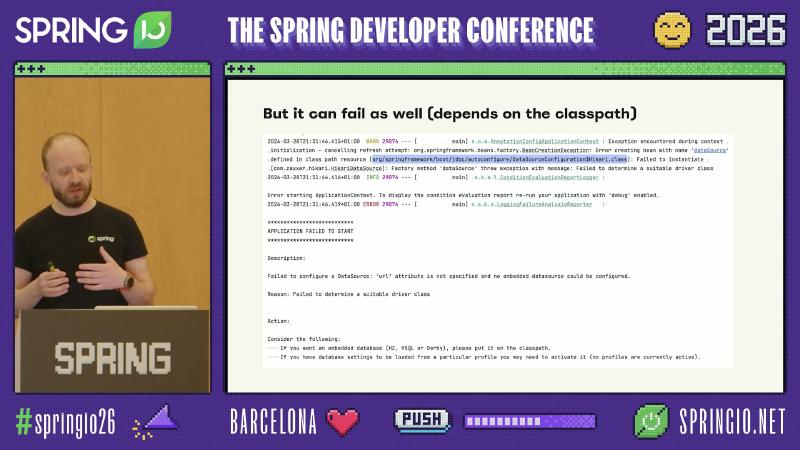
5. 自动配置与数据源:条件报告、debug 与 exclude#
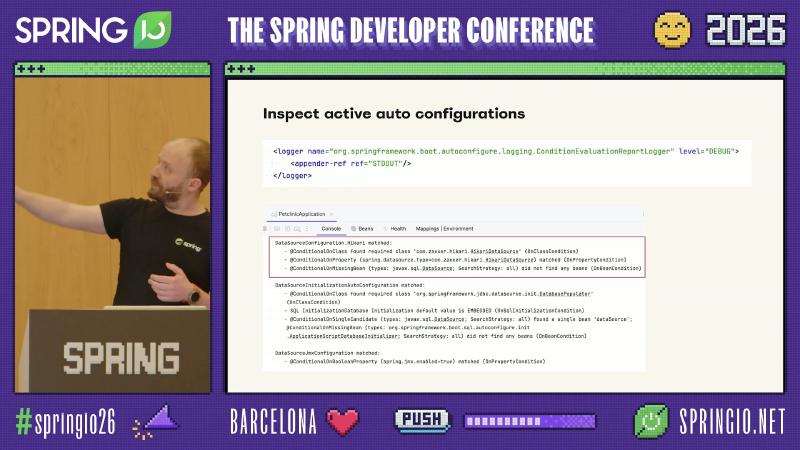
(1) 原理与动机:classpath 上出现 HikariCP 与 JDBC 相关线索时,DataSourceAutoConfiguration 可能在缺少 spring.datasource.* 配置时仍尝试创建 dataSource,从而在启动期失败。提高可见性的首选开关包括 --debug 与条件报告(自动配置);亦可暂时 exclude 相关自动配置以恢复渐进节奏。
(2) 实现抓手:排除方式包括 @SpringBootApplication(exclude = …) 或 spring.autoconfigure.exclude;具体自动配置类的全限定名随 Boot 大版本可能调整,需以当前依赖中的类名为准。
(3) 怎么用:排除目标类的全限定名随 Boot 主版本可能调整,应与当前 classpath 中实际的自动配置类对齐(必要时在 IDE 中从条件报告跳转核对)。
@SpringBootApplication(exclude = DataSourceAutoConfiguration.class)
public class PetclinicApplication { /* ... */ }
# 等价于提高自动配置可见性的一种属性路径(具体 logger 名以团队约定为准)
logging.level.org.springframework.boot.autoconfigure=DEBUG
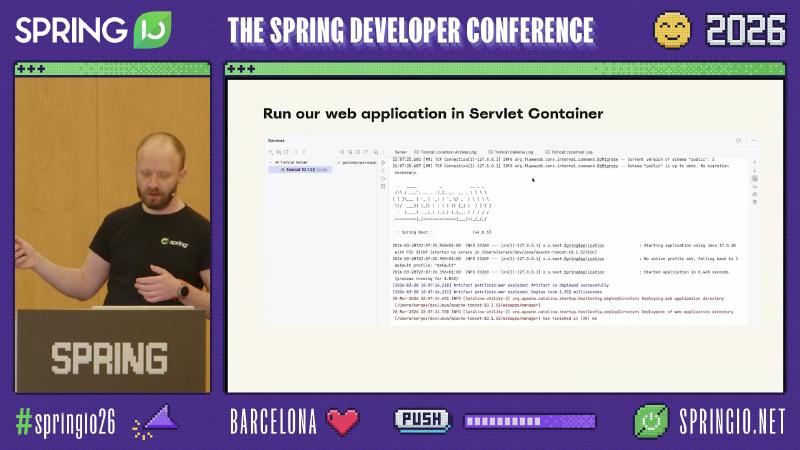
6. 外置 Servlet 容器中的 Spring 上下文:Listener 方案与手册主推路径#
(1) 原理与动机:部署在外置 Tomcat 时,main 方法不会作为容器入口执行;需要在 Web 生命周期中显式启动 SpringApplication。一种做法是在 ServletContextListener 的 contextInitialized 中调用 SpringApplication.run,并用 @WebListener 或 web.xml 注册。Spring Boot 参考文档主推 SpringBootServletInitializer 与 configure 方法完成同类目标(传统部署)。工程上应在维护成本与团队熟悉度之间选型,并将选定路径写进架构决策。
(2) 实现抓手:Listener 方案涉及 SpringApplication、ConfigurableApplicationContext 以及 contextDestroyed 中的 close();WAR 打包仍需 spring-boot-starter-tomcat 为 provided 等约束(见第 10 节与传统部署章节)。
(3) 怎么用:
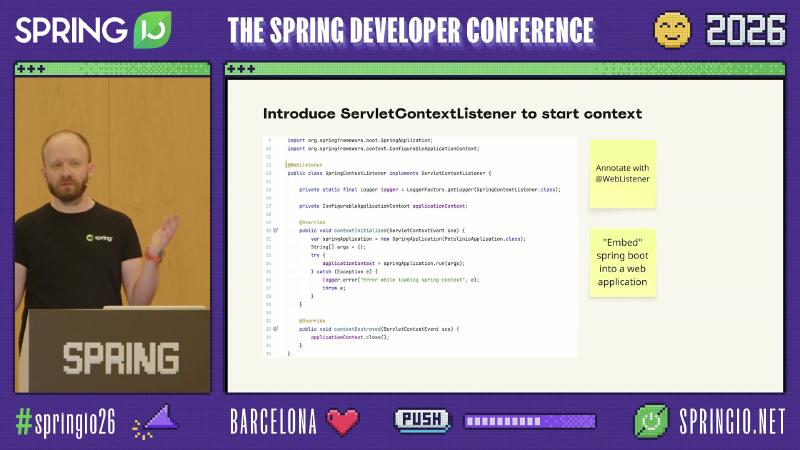
@WebListener
public class SpringContextListener implements ServletContextListener {
    private ConfigurableApplicationContext applicationContext;

    @Override
    public void contextInitialized(ServletContextEvent sce) {
        applicationContext = SpringApplication.run(PetclinicApplication.class, new String[]{});
    }

    @Override
    public void contextDestroyed(ServletContextEvent sce) {
        if (applicationContext != null) {
            applicationContext.close();
        }
    }
}
手册路径骨架(推荐对照官方完整步骤):
public class ServletInitializer extends SpringBootServletInitializer {
    @Override
    protected SpringApplicationBuilder configure(SpringApplicationBuilder builder) {
        return builder.sources(PetclinicApplication.class);
    }
}
7. 过渡期的静态访问:ApplicationContextHolder 与 ApplicationContextInitializer#
(1) 原理与动机:遗留代码若以 getInstance() 访问对象,与 Spring 构造器注入并存时会遇到初始化次序问题。静态 ApplicationContextHolder 被普遍视为反模式,但在迁移窗口可缩小改动面;关键在于在任意 Bean 可能触碰 Holder 之前写入上下文。ApplicationContextInitializer 在 Bean 定义加载前介入(事件语义见 SpringApplication — ApplicationContextInitializedEvent),配合 SpringFactoriesLoader — META-INF/spring.factories 注册清单键 org.springframework.context.ApplicationContextInitializer,可把 Holder 初始化推到安全时点。
(2) 实现抓手:实现类、META-INF/spring.factories 中的键值行续写格式,以及 Holder 内 Objects.requireNonNull 防呆。
(3) 怎么用:
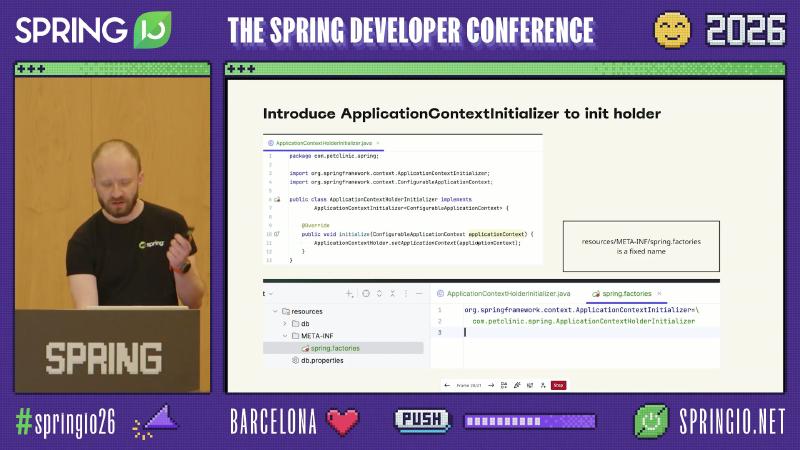
ApplicationContextInitializer<ConfigurableApplicationContext> 实现片段与 spring.factories 注册示意。
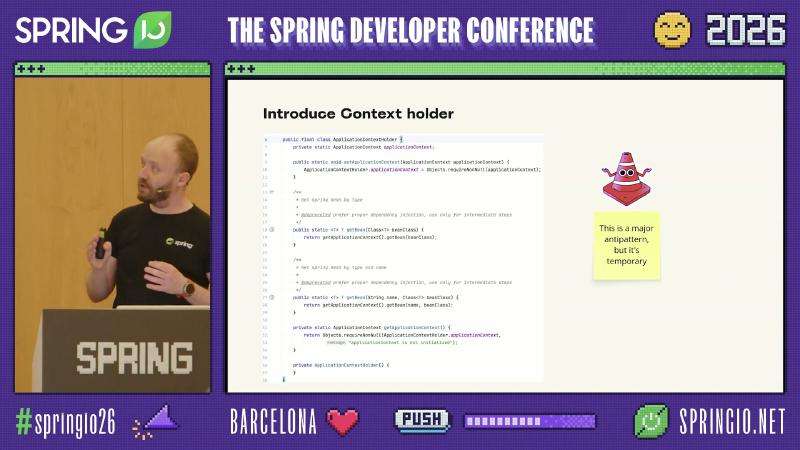
public final class ApplicationContextHolder {
    private static ApplicationContext ctx;

    public static void setApplicationContext(ApplicationContext applicationContext) {
        ApplicationContextHolder.ctx = Objects.requireNonNull(applicationContext);
    }

    public static <T> T getBean(Class<T> type) {
        return ctx.getBean(type);
    }

    private ApplicationContextHolder() {}
}
public class ApplicationContextHolderInitializer
        implements ApplicationContextInitializer<ConfigurableApplicationContext> {
    @Override
    public void initialize(ConfigurableApplicationContext applicationContext) {
        ApplicationContextHolder.setApplicationContext(applicationContext);
    }
}
# META-INF/spring.factories
org.springframework.context.ApplicationContextInitializer=\
com.example.petclinic.spring.ApplicationContextHolderInitializer
8. 从单例工厂到 @Bean / @Service:首批领域组件#
(1) 原理与动机:将仍手工读取配置的模块(例如数据源配置类)迁入 @Configuration + @Bean,可把「如何构造」委托给容器;遗留 getInstance() 暂时转发到 ApplicationContextHolder.getBean(...),以便分文件、分模块替换调用方。
(2) 实现抓手:@Bean 方法、@Configuration 类、@Service 构造型、@Import 聚合配置,以及构造器注入取代字段中的 new。
(3) 怎么用:
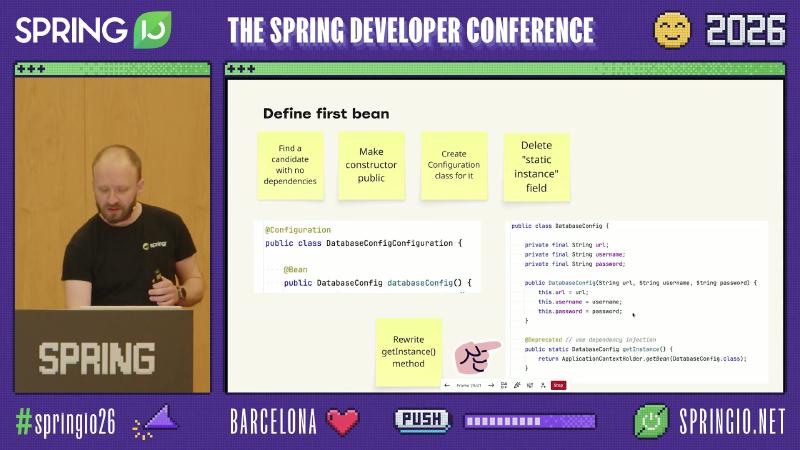
@Bean public DatabaseConfig databaseConfig()、DatabaseConfigConfiguration 等示意可见。
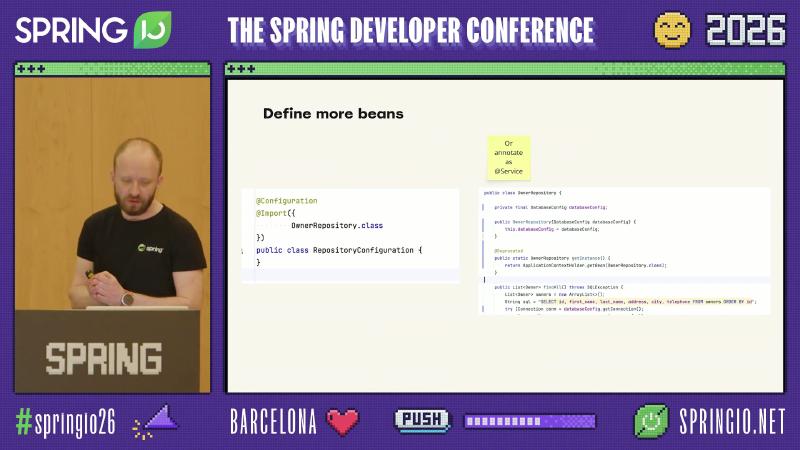
@Configuration
public class DatabaseConfigConfiguration {
    @Bean
    public DatabaseConfig databaseConfig() {
        return new DatabaseConfig("jdbc:postgresql://localhost/petclinic", "user", "secret");
    }
}
public class DatabaseConfig {
    public static DatabaseConfig getInstance() {
        return ApplicationContextHolder.getBean(DatabaseConfig.class);
    }
    /* ... */
}
@Service
public class OwnerRepository {
    private final DatabaseConfig databaseConfig;

    public OwnerRepository(DatabaseConfig databaseConfig) {
        this.databaseConfig = databaseConfig;
    }
}
循环依赖若在静态图中被掩盖,迁入 Spring 后可能暴露;@Lazy 与懒初始化语义需结合依赖方向谨慎使用,不宜当作架构修复。
9. Servlet 映射现代化:@WebServlet 与 @ServletComponentScan#
(1) 原理与动机:用 Jakarta Servlet 注解取代纯 web.xml 映射可减少部署描述符漂移;在嵌入式容器路径下,Boot 提供扫描注册能力(@ServletComponentScan),更低版本则可用 ServletRegistrationBean 等显式注册同一批组件。
(2) 实现抓手:jakarta.servlet.annotation.WebServlet、主类上的 @ServletComponentScan、ServletRegistrationBean / FilterRegistrationBean(见 Servlet Web Applications)。
(3) 怎么用:
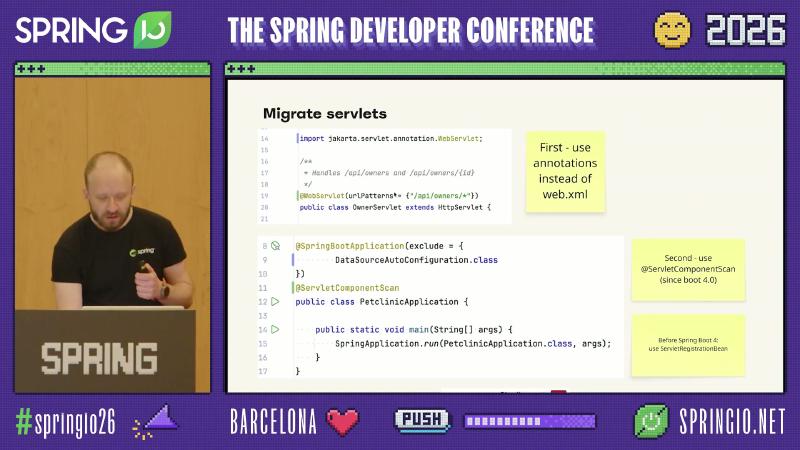
@ServletComponentScan)。
@WebServlet(urlPatterns = {"/api/owners", "/api/owners/*"})
public class OwnerServlet extends HttpServlet {
    @Override
    protected void doGet(HttpServletRequest req, HttpServletResponse resp) throws IOException {
        resp.setStatus(HttpServletResponse.SC_OK);
        resp.getWriter().write("ok");
    }
}
@SpringBootApplication
@ServletComponentScan
public class PetclinicApplication {
    public static void main(String[] args) {
        SpringApplication.run(PetclinicApplication.class, args);
    }
}
演示约定:自定义请求头仅在跨切面观测时需要;上述 doGet 若需读取头字段,使用 req.getHeader("X-Demo-Trace") 等与客户端约定一致的名字即可。
10. 可执行 WAR:repackage、provided 与 WEB-INF/lib-provided#
(1) 原理与动机:Spring Boot Maven 插件的 repackage 目标生成可在命令行 java -jar 启动的布局,同时仍可作为标准 WAR 部署;把嵌入式 Tomcat 标记为 provided 可使相关 JAR 落入 WEB-INF/lib-provided,降低与外置容器自带实现的类重复加载风险(spring-boot-maven-plugin — packaging、传统部署 — lib-provided)。
(2) 实现抓手:<goal>repackage</goal>、spring-boot-starter-tomcat + <scope>provided</scope>、WEB-INF/lib-provided 关键词。
(3) 怎么用:
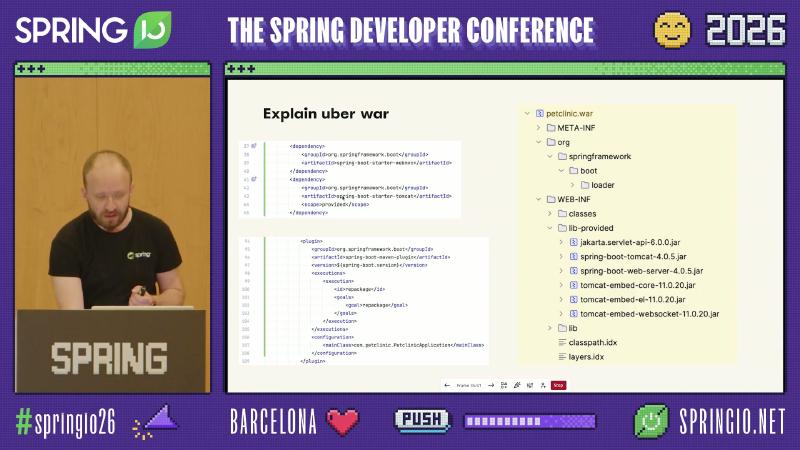
<artifactId>spring-boot-maven-plugin</artifactId>、「spring-boot-starter-toncat」「provided」等片段可见(OCR 对 artifact 名存在字符误差,语义指 spring-boot-starter-tomcat)。
<packaging>war</packaging>
<dependencies>
  <dependency>
    <groupId>org.springframework.boot</groupId>
    <artifactId>spring-boot-starter-tomcat</artifactId>
    <scope>provided</scope>
  </dependency>
</dependencies>
<build>
  <plugins>
    <plugin>
      <groupId>org.springframework.boot</groupId>
      <artifactId>spring-boot-maven-plugin</artifactId>
      <executions>
        <execution>
          <goals><goal>repackage</goal></goals>
        </execution>
      </executions>
    </plugin>
  </plugins>
</build>
11. 双引导路径与上下文路径:重复上下文风险与 server.servlet.context-path#
(1) 原理与动机:若 main 启动路径仍会触发与 WAR 部署相同的 ServletContextListener(或其它第二条引导链),理论上可能出现嵌套的 Spring 上下文直至资源耗尽——这类组合属于具体部署方式的实例风险,官方手册未必逐场景描述,应以日志中重复的 Banner、Bean 重复注册或资源告警为信号排查。另:java -jar 与外置容器的默认 context-path 往往不同,需与既有集成测试 URL 对齐。
(2) 实现抓手:server.servlet.context-path(配置元数据描述为应用的 context path);应在「仅容器」「仅 main」「Uber WAR 两种启动」三条路径上分别验证。
(3) 怎么用:
server.servlet.context-path=/petclinic
java -jar target/petclinic.war
curl -sS -o /dev/null -w "%{http_code}\n" "http://localhost:8080/petclinic/api/owners"
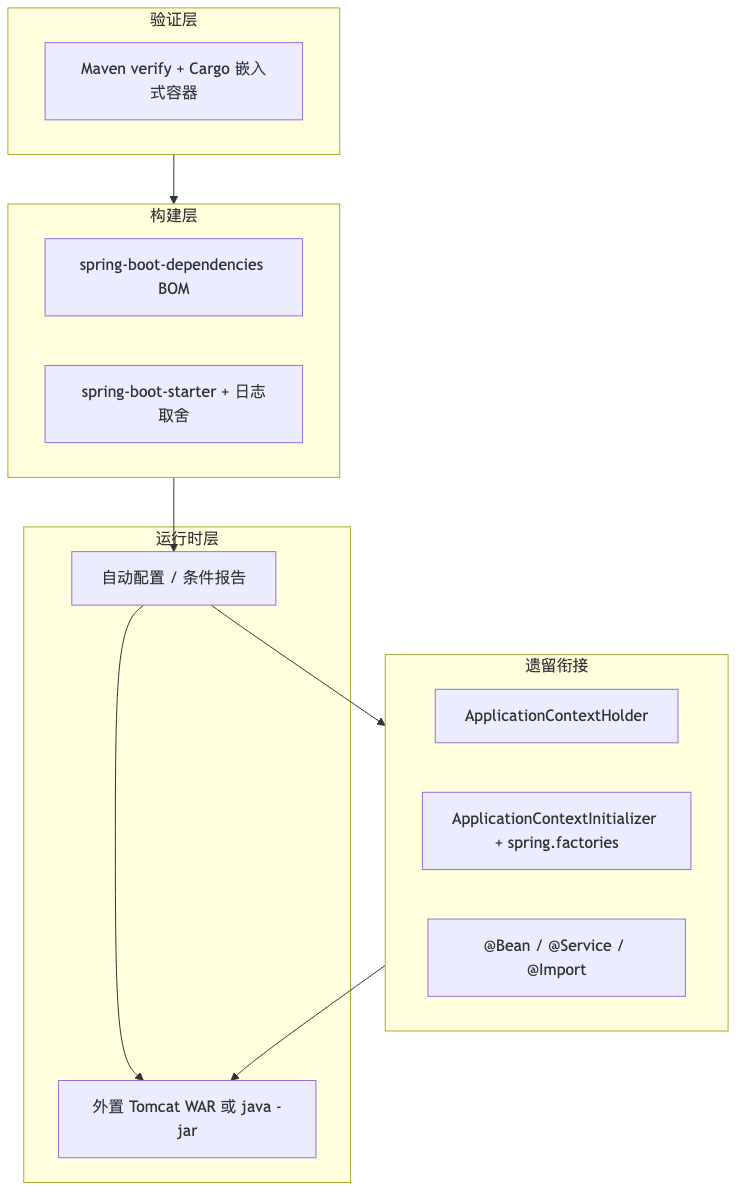
架构对照:分层迁移与运行时路径#
下列示意图压缩多步演示为可沟通的静态视图(标签刻意使用引号包裹含 @、/ 的文本以降低渲染器歧义)。
flowchart LR
  subgraph war_paths["同一 WAR 两条入口"]
    A["\"SpringBootServletInitializer.configure\""]
    B["\"ServletContextListener + SpringApplication.run\""]
  end
  subgraph packaging["打包语义"]
    R["\"spring-boot-maven-plugin repackage\""]
    P["\"provided\" Tomcat -> WEB-INF/lib-provided"]
  end
  war_paths --> R
  R --> P
参考与延伸阅读#
- Codehaus Cargo — Maven 3 Plugin 用法与生命周期组合
- Codehaus Cargo — Tomcat 10.x 容器标识
tomcat10x - Maven — 生命周期各阶段职责
- Spring Initializr(start.spring.io)
- Spring Boot — 系统要求(Java 版本范围)
- Spring Boot 3.0 GA 博文 — Java 17 与 Jakarta EE 方向
- Spring Boot — 构建系统、
spring-boot-dependenciesBOM 与 Starters 表 - Maven — Importing Dependencies(
importscope 语义) - Spring Boot — 日志参考(默认 Logback)
- Spring Boot — How-to:切换到 Log4j2(含 exclusion 示例)
- Spring Boot — 组织代码与
@SpringBootApplication扫描边界 - Spring Boot — SpringApplication 与 Web 环境判定
- Spring Boot — 自动配置、
--debug、排除项与DataSourceAutoConfiguration示例 - Spring Boot — 传统部署(WAR、
provided、可执行布局、SpringBootServletInitializer) - Spring Boot —
SpringBootServletInitializerJavaDoc - Jakarta Servlet —
ServletContextListenerAPI - Jakarta Servlet —
@WebListenerJavaDoc - Spring Framework —
SpringFactoriesLoader(META-INF/spring.factories) - Spring Framework —
ApplicationContextInitializerJavaDoc - Spring Framework —
@Lazy与懒初始化语义 - Spring Boot — Servlet Web(
@ServletComponentScan与 RegistrationBean) - Spring Boot Maven Plugin —
repackage与 WAR 布局说明